

 I didn't use a specific pattern for the hat, but if you know the principles of crocheting 'on the round' it is quite simple. I used a single crochet stitch, which I thought gave a nice natural textured weave, and made it long enough to roll up a brim at the bottom, and finally made a short stalk on the top.
Jill phoned me today to thank me for the hat I had posted to her, and I was relieved to see it fitted.
Monday, 15 February 2010
Acorn Hat for Pixie Girl
I am always deeply flattered when someone asks me to crochet something for them, so when my sister Jill (PixiePeg crafts) asked me if I would mind making an acorn hat for her I was thrilled (if a little nervous) at the challenge. In the end I decided to use a chunky wool mix yarn in a nice brown shade. Because the wool was chunky, it made up in no time, although as always when you can't see a person to measure as you go, I was worried the hat wouldn't fit..
Tuesday, 9 February 2010
I ♥ Hearts
 I have a big thing for hearts - their curvy shape, symmetry, lush red colour and the country cottage feel they can lend to a home. If you were to come round to my house, you would notice them dotted in practically every room.
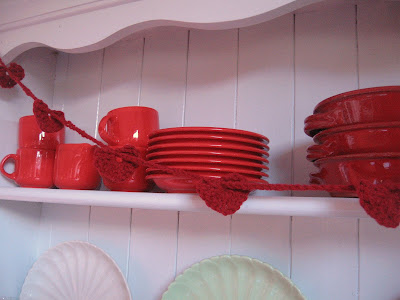 I love this heart garland I made to decorate my dresser at Christmas time, so much so much it never came down. Click here for this great pattern on the blog Suzie's Stuff.


 I have been trying my hand at a pattern for a 3d crochet heart, and I have to admit, I am finding it tricky to get my heart symmetrical!
 There are many patterns on the Internet for crocheted hearts, but I found this one the simplest to follow at Instructables. A bit more practice I fear before the 14th!
Monday, 8 February 2010
The Kindness Offensive
I love the ethos behind The Kindness Offensive - a London based movement who state their objective as, 'to create projects that are fun, inspiring, and which leave the world better than we find it.' What an ace thought to start the week with.

Wednesday, 3 February 2010
Lacy, Chunky, Cardigan
 I have found it a challenge to find crochet patterns for nice, light cardigans that also flatter when worn and so have found myself returning to this one time and time again. This is the 3rd time I have made this cardigan, and as all were made using very different yarns and colours, they have all turned out differently. The pattern is called Chevron Lace Cardigan, and is published on 'Without Seams' blog (very inspiring and talent soaked!). I found it via Ravelry, it's probably the most popular cardigan pattern on Ravelry, and no wonder as it is such a breeze to make. It's a top-down style pattern which means the garment is made in one complete piece , top downwards.
I had planned to make this one longer in length and in the sleeves, but unfortunately ran out of yarn, but I reckon it'll still come in use for layer, wearing on top of dresses etc..
 Oh, yes and the sun was shining today when I took these photos - Bliss! roll on Springtime (of course we need the Snow to melt first!) and new cardigans!!!
Tuesday, 2 February 2010
Sometimes....
Sometimes it takes me a while to get round to finishing things. Eight years ago, pregnant and desperately seeking distraction from all engulfing nausea, I started weaving some pressed strips of fabric and promised myself I'd make something fantastic that would be enjoyed for years to come. The woven strips were secured together with a lot of ironing and a whole lot more wonderweb; I was still convinced sewing machines hated me back in '02. Amazingly, I ended up with two rather pleasing woven panels which were largely useless but looked nice.

I kept one of the pieces for myself (currently residing in the loft - shame on me) while the other piece went to my Mum. She placed it proudly on her sofa arm and admired it a while and then (to her mortification and my shrieks of laughter) she spilled red wine on it and hushed it away affrontedly into a drawer while we pondered how best to clean it.
Last weekend I was searching for sewing inspiration amongst my remnants and there it was... enticingly half finished and Daffodil sunny, peeking out from behind a bag of curtain tape, waiting for an evolution, Mum's woven panel made mine again by her sad passing. It's now a cushion cover - all stabilised with real stitches, a history of its own and a comforting future ahead. It's a sweet reminder of my Mum, my daughter's journey into the world and some of the stories that have woven all three of us together in times gone by. Truly precious, to yours truly. Here it is playing artistic homemade pillow pile up with it's friends...........

Sometimes I see something simple and fantastic and can't wait to get stuck in. That's exactly what happened when I saw a totally cool Valentines Day sachet on Whip-up.net I didn't have any felt in my stash but, itching to produce something on the back of fresh inspiration, I decided to go on some sewing adventures with the lightweight sheets of funky foam the kids like to chop up. So far I've made husband's Valentine's day card and am working on what I anticipate will be the first of many sachets as per the brilliant Whip-up.net instructions. I've ground to a halt at the section that requires me to get the iron out. I'm hoping this mental block will pass soon so watch this space and enjoy the eye candy on the Whip-up tutorial meantime.

Tuesday, 19 January 2010
Crocheted Cotton Baby Blanket & little Friend (With Pattern)
 I have a friend who lives on the other side of the world from me in Australia and has recently given birth to a little boy. It's summer over there right now, so cosy hats and jumpers were out of the question, so I have crocheted a light cotton blanket and a little Koala bear with the same cotton to accompany it.


The blanket was very easy and quick to make, using a V-Stitch (dc, ch 1, dc in same stitch) for the body of the blanket and a simple Picot edging. I used a pattern from Amigurumi Two! (Ana Paula Rimoli) for the small Koala teddy.
Pattern for V-Stitch baby Blanket
Ch 88.
Row 1 (Dc, ch 1, dc) in 5th ch from hook, [skip 2 ch, work V-st in next ch] across to last 2 ch, skip 1 ch, dc in last ch – 28 V-sts and dc at each end of row.
Row 2 Ch 3, turn; work V-st in each ch1-space across, end dc in top of turning chain.
Repeat Row 2 for V-st pattern until there are a total of 34 rows; ch 1 (instead of ch 3), turn. DO NOT FASTEN OFF.
BORDER
Sc in each dc and ch1-space across, end 3 sc in last dc; rotate to side, sc evenly along side edge, 3 sc in first ch of foundation ch; sc in each ch across, 3 sc in last ch; sc evenly along rem side edge, end 2 sc in top of last row turning chain, join with slip st to top of first sc.
Picot Edging
(Ch 2, slip st in second ch from hook, skip 1 sc, slip st in next 2 sc) around, adjusting for corners and end of rnd.
Fasten off. Weave in ends.
Saturday, 16 January 2010
Quick and Easy Floor Cushion
 We have been doing a lot of lounging lately, mainly due to the lousy weather and forced confinement within the house. We have all been trying to embrace the situation, snuggling up, watching movies, playing board games etc.. My boys love to lie on the floor in front of the fire, so when passing through Edinburgh at Christmas time I picked up some cheap fabric from Ikea to revamp some old abandoned floor cushions. I must admit I am rubbish on the sewing machine, too slap-dash and impatient, so I opted for an envelope style (think pillowcase) cushion cover to avoid having to worry about adding zips or buttons. Heres a quick tutorial of how I made them:-
Step one - Measure and cut out material
 The cushion cover apparently should be the same size as the pad, to give a nice fit. Cut the length of fabric so that the ends overlap envelope style when folded over the pad.
Step 2 - hem each end

Step 3 - fold up and pin into position

As you can see the 2 ends over lap here( right sides facing). the idea is to sew right up each side from top to bottom - simple!
Step 4:- Sew up and trim

Because my fabric was a bit too wide for the cushion pad, I sewed generous hems on each side and then trimmed them down for neatness.
Step 5 - Un-inside out Cushion cover and insert your pad

ok, a bit slap dash, but the end result is great. So easy I made another...

Tuesday, 12 January 2010
Happy Birthday Dear Blog.....
Well, there it went....... the first year of GWI blogging! What a brilliant first year it's been too. It's fantastic to see each other's creatively inclined finds on and off the internet and, of course, looking at the back catalogue of our own work is a great reminder of achievements as individuals and as a group. It has also been lovely to start receiving feedback from our blog readers - what a treat.

I've loved pretty much every post on our wee blog but if I had to choose... my personal favourites, in no particular order, would be.........
Pam's crocheted scarf for her Mum ~ Ali's post about Ron Mueck's exhibition at Aberdeen Art Gallery (which inspired an unforgettably brilliant day out for me and mine in the Granite City) ~ Fiona's post about her brilliant lampshade ~ the simplicity of Elaine's fabric printed tablecloth and the 'Nothing is original' Jim Jarmusch quote post, because I love the positive, creative and honest sentiments of his words.
And then I think of all the things we did and haven't blogged about yet... our mosaic frames, lino cutting, all those crocheted heart garlands that the hookers among us rattled up for Christmas time... our hilarious attempts to clean sheep fleece in readiness for adventures in felting... The metres of bunting for kiddy birthdays and cakes, biscuits and bakes galore. Sweet.
Happy Birthday Blog!
Saturday, 9 January 2010
Lacy Crochet
 I have been messing about with some new crochet techniques lately and thought I'd try my hand at a bit of lacy crochet. I bought the book 'KYUUTO! Japanese Crafts - Lacy Crochet' last year and have been trying to get my head around following a diagram instead of a written pattern. Once mastered, I'm sure this will open up a whole new world of fabulous Japanese crochet patterns.
 So, as you can see above, each stitch is represented by a symbol on the diagram, fairly straight forward? hmm, I'm not too sure...I didn't progress further than the 3rd round when I tried out this lacy doily (see top photo). This is what the finished item should look like(photo taken from afore mentioned book):-
 It was an enjoyable challenge to work with the fine crochet threads I've had in my stash for a year or so now, picked up for pennies from my local Charity shop. I also used a 2mm hook from my new set of hooks my Mum gave me for my birthday last year - fiddly, but I love the delicate results - must try harder next time, I'd really like a hand crocheted doily for my dresser!!
Tuesday, 5 January 2010
January Cheer
All my Christmas decorations are down and tidied away for next year, and the house is looking plain and a bit drab to me now. I'm particulary missing our colourful bauble wreath that has been hanging on the front door for almost a month now. Luckily for me I have a replacement to cheer me up through the long wintery days of january:-


This particular wreath is made from Hazel twigs which still have their tiny catkins attached. The bright red gingham ribbon is a lovely contrast to my blue door and the little robin an interesting detail. Thank you Jill - I love it, January isn't going to be quite so gloomy for me this year!!

 This beautiful wreath was a gift from my sister Jill at Christmas time. Jill uses natural materials, gathered in her local area of Northumberland to make her wreaths and other crafts. Her blog Pixiepegs gives details of inspiration and material choice.
This particular wreath is made from Hazel twigs which still have their tiny catkins attached. The bright red gingham ribbon is a lovely contrast to my blue door and the little robin an interesting detail. Thank you Jill - I love it, January isn't going to be quite so gloomy for me this year!!
Subscribe to:
Posts (Atom)